Documentation
This is the users documentation to know how the Bot works.
Description
The GeoCollectorBot allows the collection and manages georeferenced reports on the field, that are sent to those who use them for managing and improving user services. It is a free and open-source tool that does not require the installation of other specific applications besides Telegram. It’s made of:
a Telegram Bot API, that allows controlling the sending of messages from the users to the offices and the feedback of the office admins to the users;
a Dashboard Web with visualization, research, modification of collected reports, and notification send to the users’ functionalities;
a Database where the Bot saves all the information.
Installation
- To access the Bot, the installation of Telegram is necessary and available on:
Android
IOS
Desktop
Since it doesn’t require installing any other specific application, it favors the contribution to sporadic users as well. The Bot can be used both in desktop and mobile versions, but it is meant for the second one, as it allows reporting real-time problems, that are sent and organized automatically in a database to be solved as soon as possible.
Access
The Bot is online and reachable from Telegram at the following link or directly typing GeoCollectorBot_Insubriparks in the application search bar.

Form filling and type of collected data
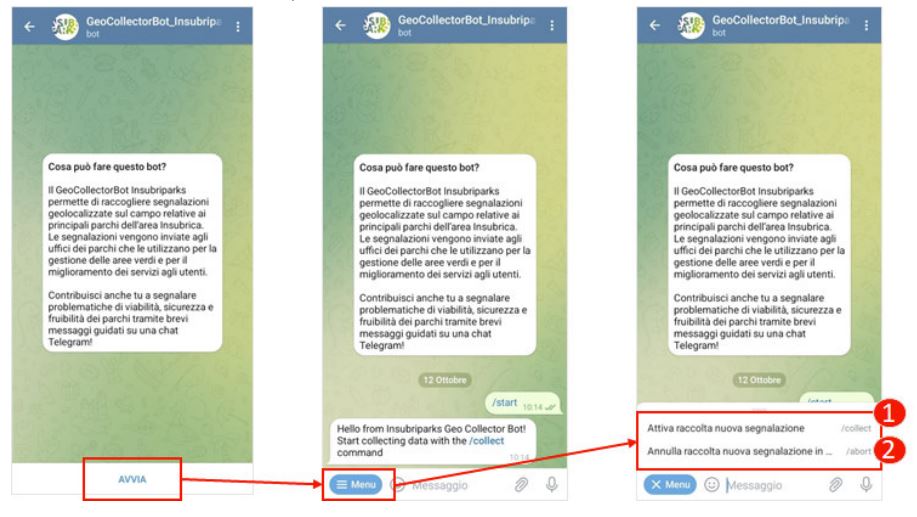
At the first start of the chat, a short description of the Bot will appear, with a welcome message. To activate the chat the user is asked to use the button AVVIA. On startup, a MENU will be available in which it will be possible to activate the data collection for a new report or to delete the current one.
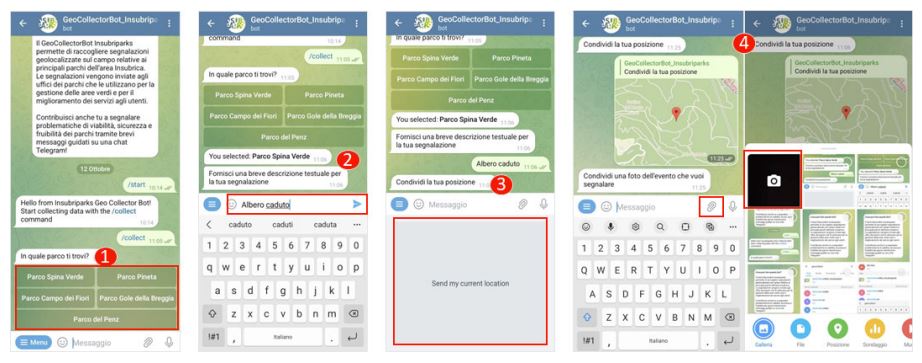
- The data that the Bot allows to collect are the following:
Multiple choice: click on one of the options to tell which place the report is referring to;
Textual description: type the text and press the button INVIO;
User position: click on the box to share your location at that precise moment (it may be necessary to allow localization services);
Photo: click on the button INSERISCI ALLEGATO to be able to take a picture or select it from the gallery and after that press INVIO.
Step 1
Once the installation is complete, the Bot can be found at this link, and at the first start the screen that appears is the following.
The first available command is /start, which allows starting the Bot.
Then, as indicated by the Bot answer itself, it is possible to start data collection through the command /collect. It is not necessary to write this command, it is sufficient to click on the one received in the message. It is always possible to abort the current insertion by clicking on the menù button on the bottom left of the screen, and it has to be done if a new insertion wants to be started.
Step 2
The Bot proceeds to list some places and the user will have to select the one where he is. Any text insertion will be considered invalid, as you are expected to select only from the provided list.
Step 3
The bot will confirm the user’s choice and ask him to provide a description of the problem found. The user will have to insert a text message that illustrates what happened in the most concise but exhaustive way possible. Any answer that is not textual will be invalid, so it is not possible to send photos, attachments of any kind, or any other stuff at this step.
Step 4
After that, the Bot will proceed to ask the user to share his location, so the activation of the location services is required.

Step 5
The last step asks to provide photos that picture the problem found, as proof of the event. Only an attached photo will be considered a valid answer. Once this last step is completed, the Bot will save the answers.
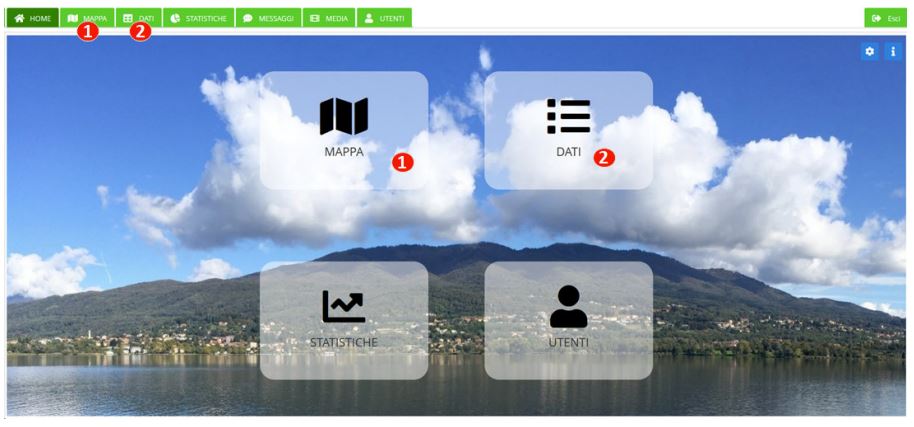
Visualization and management of the reports through a Web Dashboard
A Dashboard has been provided to test the correct functioning of the Bot. In particular, it analyzes visualization, research, modification of collected reports, and notifications sent to the users’ functionalities.
In general, the Bot can be connected to every system that can manage geospatial data and it allows to receive feedback messages through these systems. The example below shows the connection to InsubriParks. In its final form, the Bot will be integrated into the prototype version of PAM and will use the functionalities of report managing itself. The instructions reported below are deliberately minimal and exclusively refer to the Dashboard testing functionalities of the Bot.
Access to Dashboard
The link to access the Dashboard is here. The browser may ask to confirm over warnings on connection security.

User credentials can be provided as shown in the table below. For the purpose of testing, a test name and password have been created.
Access to reports
The reports can be accessed through the map or the table.
By clicking on one report on the map, it is possible to open the control panel and visualize its content (text, photos, …).

The same panel can also be opened from the table by double-clicking on the relative row.

Managing reports
- From the same control panel, by opening the subpanel
MESSAGGIand clicking onNUOVO MESSAGGIOit is possible to: change the status of a report from
APERTA`(default) to :file:`PRESA IN CARICOandCHIUSA. To make the change effective, it is required to save. The current state of each report is visible from the map through different markers, while the change status history can be seen in theMESSAGGIsubpanel;

add a comment on a report, using the text box Messaggio and save it. The comment history can be seen in the
MESSAGGIsubpanel as well;
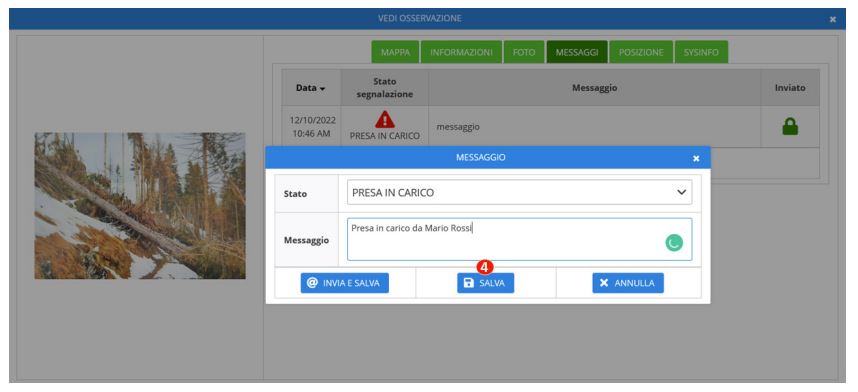
send a message to the chat of the user that created that specific report through the same Messaggio box, by using the
INVIAbutton and then saving. The user will receive the feedback directly in the Telegram chat. The message history can also be seen in theMESSAGGIsubpanel.

Deleting a report
To delete a report, it is sufficient to right-click on the specific row of the table and use the button CESTINA.
